Step by step guide to connecting to ec2-instance which is using bastion host as a public sever(contains public IP) and another ec2-instance as a private server(contains private IP)
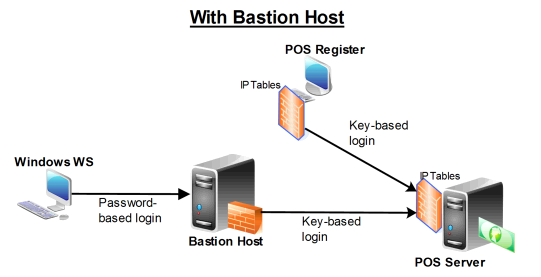
It is more secure to hide your server behind a bastion host as you can not create a direct connection to the server. You must create an ssh connection with a private key file(.pem file) to the bastion host server after that you can start RDP session with servers connected to this bastion host.
1. Terminal with ssh command enabled
2. Microsoft Remote Desktop app if connecting to the window server
Gitbash with ssh command enabled if not installed, install from below link
https://gitforwindows.org/Open your terminal and paste below command to create an ssh connection with Bastion Host. You have to replace variables with ports and IPs of the Bastion host server and actual server.
ssh -L port1:ec2-instance-private-IP:port2 -i ~/path-to-pem-file/file-name.pem bastion-username@bastion-host-IPThe description for variables used in the above command is as below
You can assign port1 any value that you want. We will use it while creating an RDP connection with our server. For example, we can assign 33381 value to it.
This is the IP address of your ec2-instance which is behind the bastion host. You can replace it with your server Private IP. For example, we can assign 0.0.0.0 value to it.
You can assign port2 any value that you want. For example, we can assign 3388 value to it.
Replace this path with the actual path where your private key file exists. If it exists inside a folder name as doc the path will be - ~/doc/file-name.pem
Replace this with your server username. For example, ec2-user
Replace this with the public IP of Bastion host. For example, we can assign 1.1.1.1 value to it.
Final command based on above-assigned values will be
ssh -L 33381:0.0.0.0:3388 -i ~/doc/file-name.pem [email protected]WARNING: UNPROTECTED PRIVATE KEY FILE!
To fix this on MAC or Linux run below command inside your terminal
sudo chmod 600 /path/to/my/key.pemAfter this, run ssh command again and connection will be made.
After successfully connected via ssh we can initiate a session with our server.
Open Microsoft Remote Desktop app and enter credentials inside it
PC name - 127.0.0.1:port1(for example we have assigned 33381 value to it)
Username - Username of your server(For example, Admin)
Password - Username of your server(For example, AdminPass)
Open RDP connector by running 'mstsc' inside run prompt(windows+R) and enter credentials inside it
Hostname/PC name - 127.0.0.1:port1(for example we have assigned 33381 value to it)
Username - Username of your server(For example, Admin)
Password - Username of your server(For example, AdminPass)
And you are good to go! Thanks for reading.


0 Comments